
About this manual
This manual explains how a Project Owner uses the Lao PDR National Carbon Registry (CCIS) at carbonregistry.gov.la: creating an account, completing the legal status check (Step A), registering a carbon project, submitting applications, paying fees, and receiving letters and certificates.
The registry follows the Lao PDR Carbon Project Approval and Management Guidelines. References such as G§57 point to the paragraph of the Guidelines that a rule comes from.
Everything in the registry is available in English and Lao. Use the ລາວ / EN button at the top of any page to switch language. Your choice is remembered.
You do not need to finish anything in one sitting. Forms and documents are saved as drafts, and nothing is sent to the DNA or a Relevant Sector until you press Submit.
What changed in version 1.3 (November 2026)
- The Step B letter is now called the Carbon Credit Project Approval Certificate. At Step C you no longer upload a copy of it.
- Step B documents:
- add a cover letter to the Relevant Sector;
- bring the hard copies to the Relevant Sector.
- Project form:
- scale is asked only for land-based projects;
- location is optional at the MAIN stage, with one box for the total project operation area;
- the start date and crediting period are required (indicative dates are accepted);
- help texts explain the Decree sector and the Article 6.2 sector.
- Step D2 (registration with the crediting programme) can be submitted at the same time as D1. At D2 you can search your project in the international registries.
- Step D LoA request: list the entities to be authorized, with their Entity ID.
- E0:
- the monitoring period and vintages must be within your crediting period;
- you can import issuances from a CSV (a template is provided).
- E1: the request shows what the LoA authorizes, and the quantity available by vintage.
- Letters show the signed and stamped copy once the authority uploads it.
The approval process at a glance
A carbon project moves through six steps, A to E. At each step you submit an application in the portal, the responsible authority checks it within a fixed number of working days (weekends and public holidays are not counted), and a letter or certificate is issued when it is approved.
| Step | What you submit | Who decides | Time limit | What you receive |
|---|---|---|---|---|
| A Legal status | Organisation details and legal documents | DNA | — | Verified Project Owner |
| B Carbon Credit Project Approval Certificate (B1–B3) | Mitigation Activity Idea Note (MAIN, Schedule 2), cover letter to the Relevant Sector and documents | Relevant Sector | 5 WD completeness + 25 WD decision | Carbon Credit Project Approval Certificate; for Article 6, a no-objection for a Letter of Intent |
| C Registration (C1–C4) | Registration application, within 60 WD of the Approval Certificate | DNA | 5 WD completeness + 30 WD decision | Registration Certificate; for Article 6, a Letter of Intent (LoI) |
| D1 MADD validation | Validated Mitigation Activity Design Document; for Article 6 the LoA request (Schedule 4) | Relevant Sector, then DNA | DNA review 20 WD | GHG Endorsement; for Article 6, the Letter of Authorization (LoA) |
| D2 Programme registration | Proof of registration with the crediting programme (Verra, Gold Standard…); can be submitted at the same time as D1 | DNA records | — | Registry updated |
| E Verification & ITMOs | E0: verified issuance; E1: request for positive examination (Schedule 7) | Relevant Sector, then DNA | — | Letter of Positive Examination; ITMO serial numbers |
WD = working days. The DNA may adjust the time limits in line with the Guidelines; the portal always shows the current due date.
You do not have to wait for the D1 decision to submit D2. Step E (issuance record, E0) opens when both D1 and D2 are approved.
Your account
Create an account with your e-mail
- Open carbonregistry.gov.la and choose Login → Create an account, or go to the Register page directly.
- Enter your name, e-mail address, phone number (optional) and a password of at least 10 characters with letters and numbers. Tick the statement at the end and press Create account.
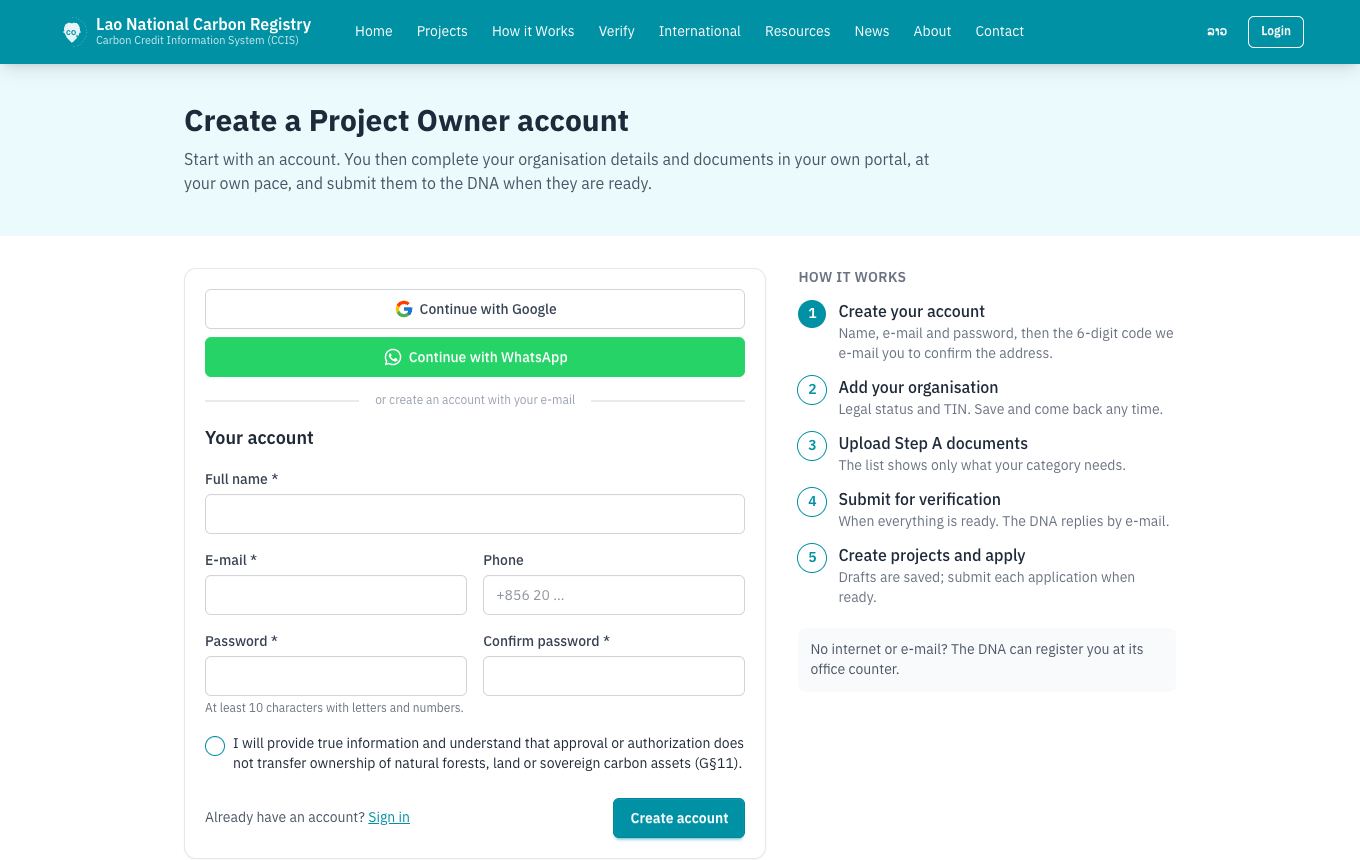
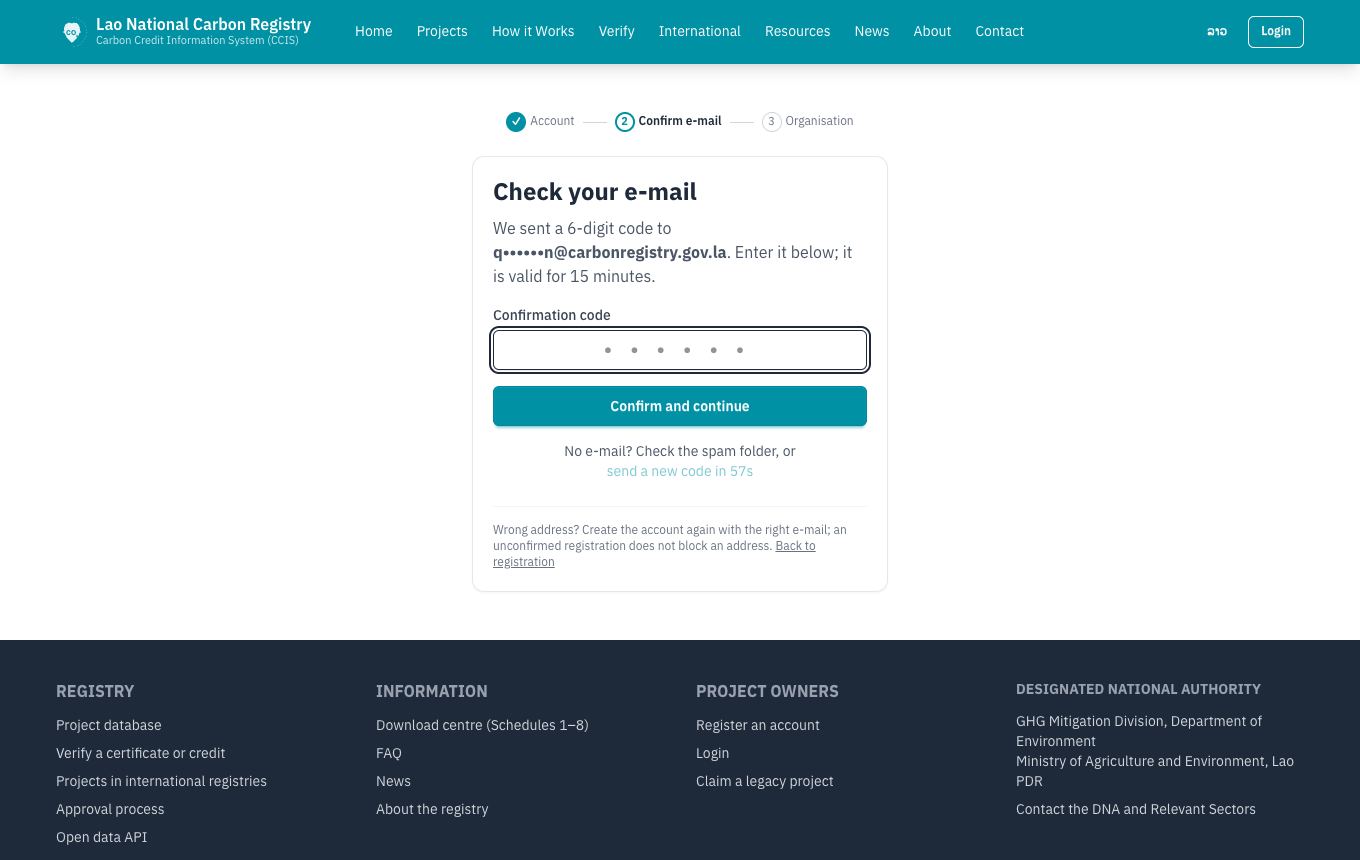
- The registry sends a 6-digit code to your e-mail. Enter it on the Check your e-mail page within 15 minutes. You can also press the Confirm my e-mail button in the e-mail.
- Your account is now active and you continue straight to your organisation (Step A).
Did not receive the code? Check the spam or junk folder. After one minute you can press send a new code. If you close the page, simply sign in later with your e-mail and password: the registry sends a new code. A registration that was never confirmed does not block the address — you can register again with the same e-mail.
Sign in with Google or WhatsApp
Instead of a password you can use Continue with Google or Continue with WhatsApp on the sign-in and registration pages. Google confirms your e-mail address and WhatsApp confirms your phone number, so no e-mail code is needed.
With Continue with Ohlom you enter your phone number on the Ohlom page and approve the sign-in in the Ohlom app on your phone. No password or code is needed. Your registry account stays linked to your Ohlom account, even if you later change your phone number in Ohlom.
Forgot your password
On the sign-in page choose Forgot your password?, enter your e-mail and open the link you receive. The link is valid for one hour and can be used once.
Applying at the DNA counter
If you prefer to apply on paper, DNA staff can register your organisation at the counter, scan your documents and submit applications on your behalf (G§22). You receive a printed receipt with a tracking code (QR) that shows the status of the application on the website.
Step A — your organisation
Before you can register projects, the DNA verifies your legal status (G§34–39). Open Organisation (Step A) in the portal.
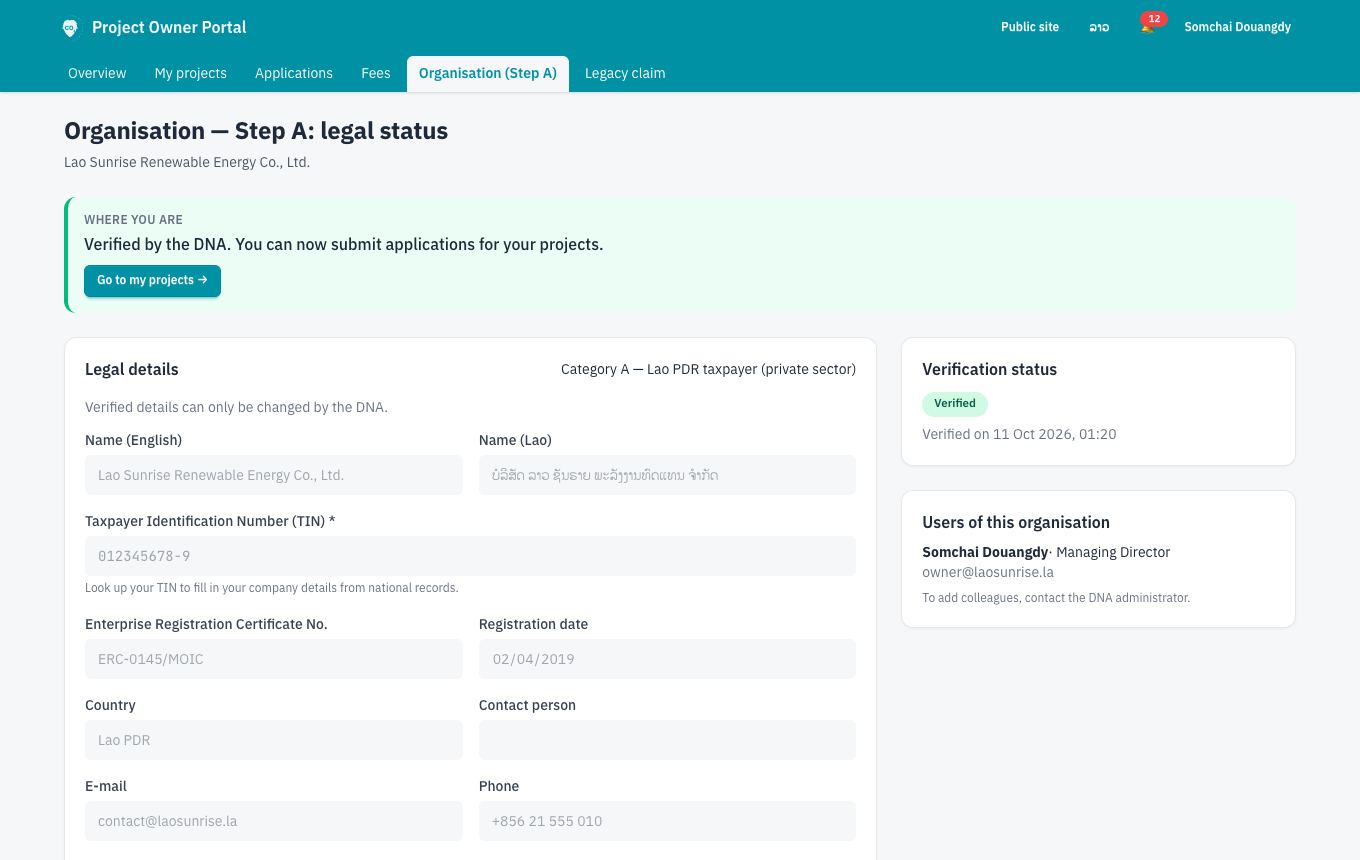
- Choose your category. The documents you need depend on it:
- A — Lao PDR taxpayer (private sector). The page first asks Do you have a Tax ID (TIN)?
- Yes: start typing the TIN or the company name — matching companies from the national business and tax records (laobiz.la) appear as you type. Pick yours, or type all 12 digits. The company profile is filled in for you: names, address, Enterprise Registration Certificate number and date (the TIN is used as the ERC number when the record has no separate one), type and status. The contact person and phone start with the registrant and the registered number; change them if someone else handles the carbon project. If something in the record is wrong, choose Something wrong? Edit details.
- Not yet: type the details yourself. The TIN is needed before you submit Step A to the DNA.
- B — non-taxpayer or international cooperation (for example an INGO with an MoU).
- G — government agency.
- A — Lao PDR taxpayer (private sector). The page first asks Do you have a Tax ID (TIN)?
- Fill in the details and press Save. You can come back at any time.
- Upload the documents listed for your category. Each line shows whether it is Required or If applicable and the template (Schedule) to use. Accepted formats are PDF and common image and office files.
- Press Submit for verification. The DNA checks the documents and either verifies your organisation or returns it with the reasons. You receive an e-mail and a notification either way.
Projects and applications can only be submitted after your organisation is verified.
Your portal
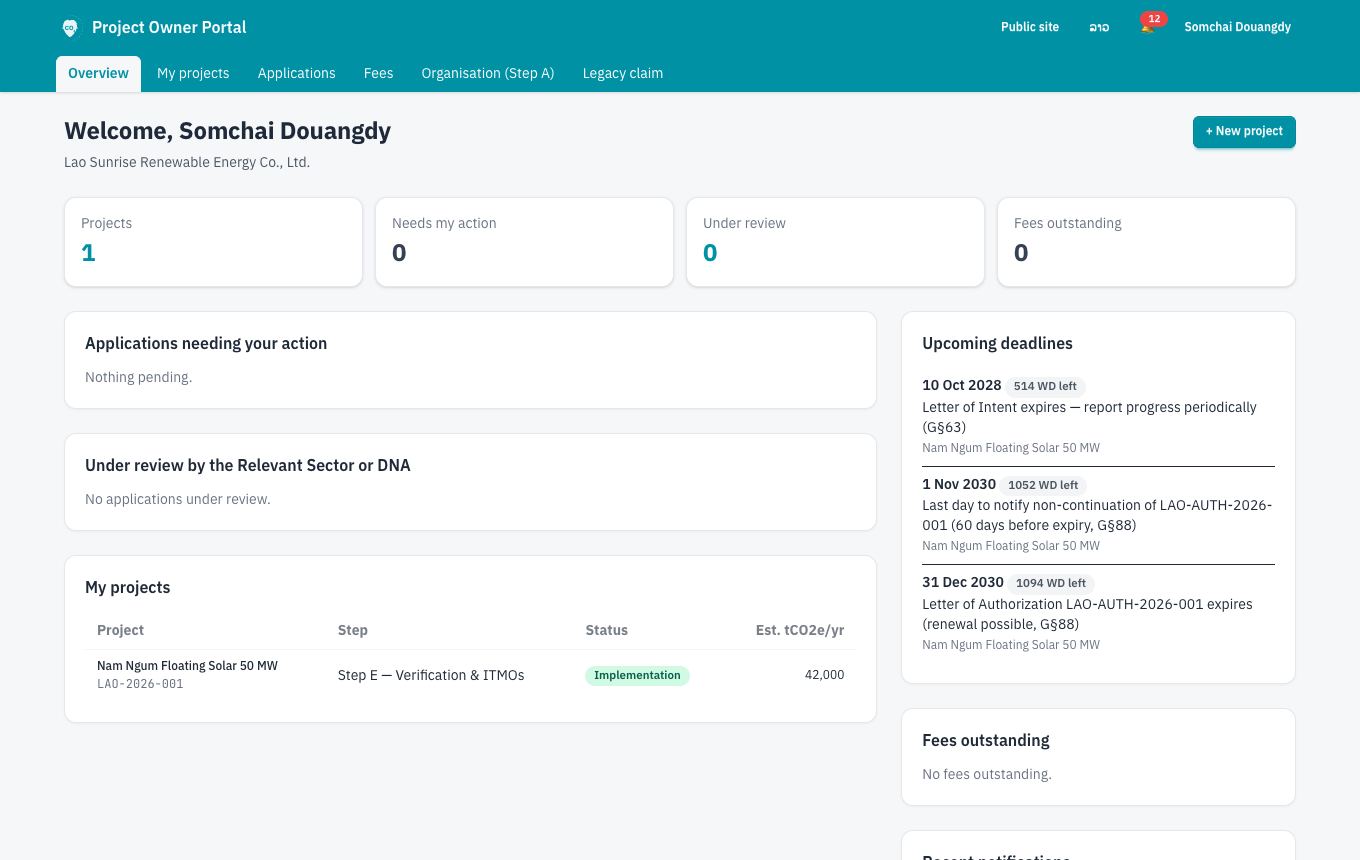
After signing in you see your portal. The menu at the top gives you:
- Overview — what needs your attention, your projects and their current step.
- My projects — every project, with its step A–E and next action.
- Applications — every application with its status and due date.
- Fees — invoices and payment slips.
- Organisation (Step A) — your legal details and documents.
- Legacy claim — for projects that existed before the registry (see below).
- The bell shows notifications. Every notification is also sent by e-mail.
Register a project
- Open My projects → New project and fill in the project form. Fields marked * are required.
- Pathway and Relevant Sector — the approval pathway and the Relevant Sector (Table 1) that reviews the project.
- Classification (MAIN, Schedule 2) — structure, crediting standard, methodology and gases, and the two sectors:
- Sector under the Decree on Carbon Credits — the national classification; it identifies the Relevant Sector that reviews the project (Table 1).
- Article 6.2 sector (UNFCCC common nomenclature) — the international classification, used only for UNFCCC reporting and the Letter of Authorization; it does not decide the Relevant Sector.
- Tick Land-use / land-based project (G§48–50) in the same section if it applies. Scale (land-based projects) is then shown and required, and the Total project operation area (ha) under 4. Location becomes required.
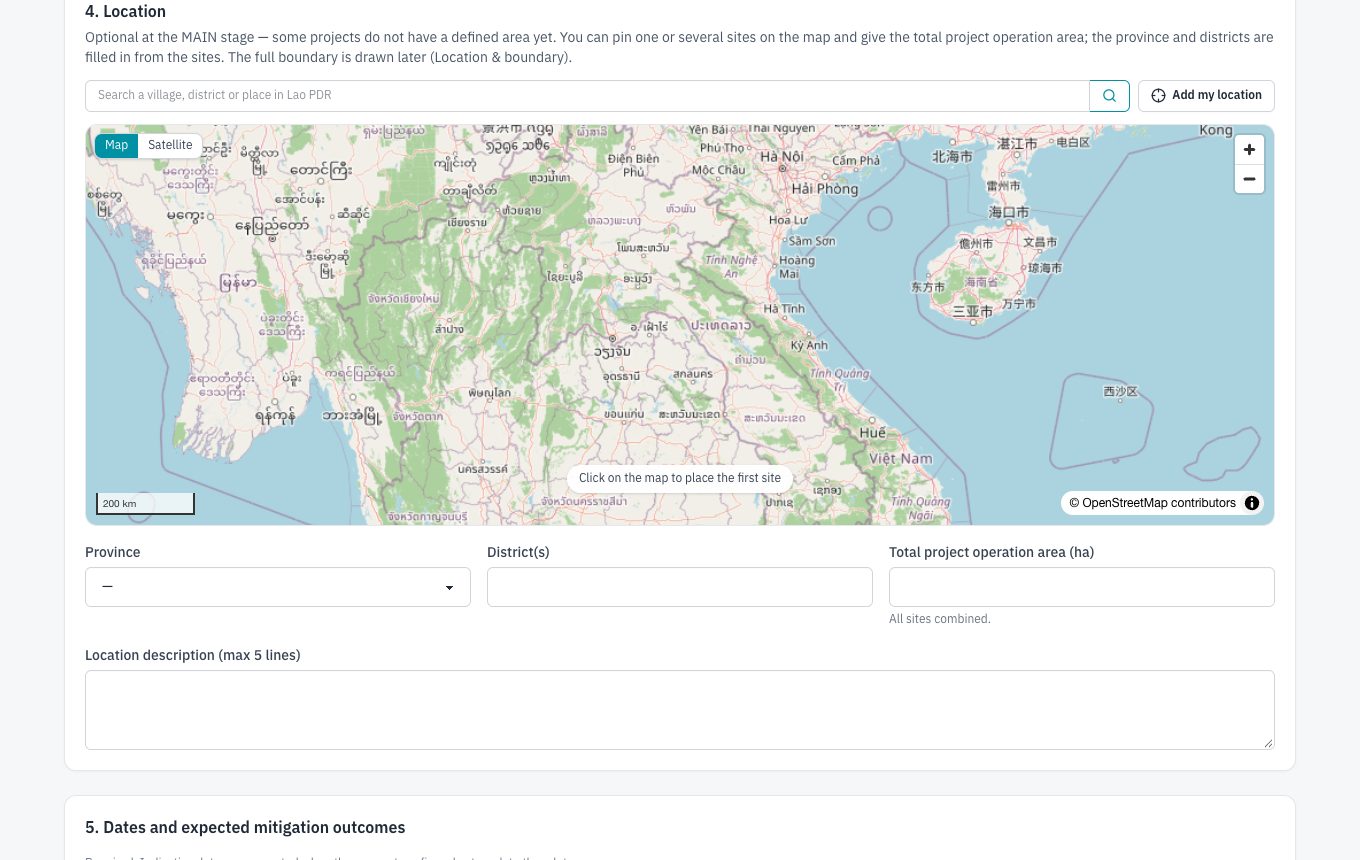
- Location — optional at the MAIN stage (see below).
- Dates and expected mitigation outcomes — Project start date, Crediting period start and Crediting period end are required. If the dates are not confirmed yet, enter indicative dates and update them later. Also give the estimated annual and total mitigation outcomes.
- Article 6 of the Paris Agreement — tick it if you intend to transfer credits internationally as ITMOs, and choose the mechanism.
- Complete the tabs of the project: Details, MAIN (Schedule 2), Location & boundary, SD assessment (Schedule 6) and, later, Credits & Article 6 and Reporting to DNA.
Pin the project sites on the map
Location is optional at the MAIN stage: some projects do not have a defined area yet. In section 4. Location of the project form, click on the map to add a site — a project can have several sites (for example several villages or plants). Each site gets a numbered pin; drag a pin to move it. You can also search a village, district or place, or use Add my location when you are on site.
In the table under the map, give each site a name and its area (ha). Each site with an area is drawn as a circle of the same size, so you can see its scale. The province and district(s) are filled in from the pins (you can still change them).
Enter the area of the whole project in the single box Total project operation area (ha) (all sites combined). When the sites have areas, the form shows Sites above add up to … — press use this total to copy the sum, or type another figure. The box is required for land-based projects.
Draw or upload the project boundary
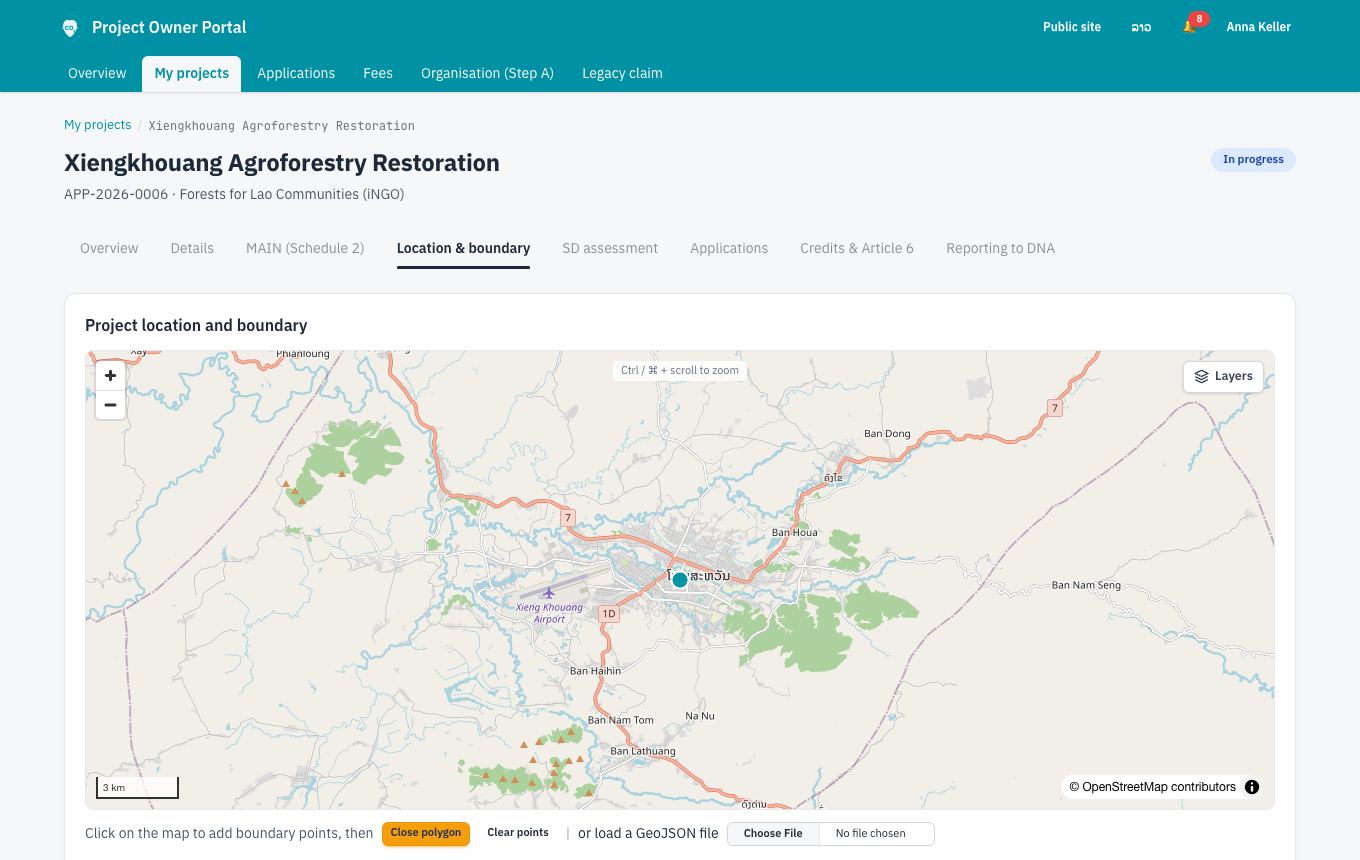
On Location & boundary, click on the map to add the corners of the project area and press Close polygon, or load a GeoJSON file. Use Layers on the map to show satellite imagery, protected areas, provinces and forest-loss layers.
Below the map, Land check of your boundary shows the provinces and districts the project lies in and whether it overlaps a protected area or another designated area. The DNA and the Relevant Sector see the same check (G§49). If there is an overlap, explain it in your application or correct the boundary.
Submit an application
- Open the project and, on its Applications tab, start the application for the next step. The portal only offers the applications that are possible at this point.
- Fill in the form. For Article 6 projects, the Letter of Authorization request (Schedule 4) is part of the D1 application.
- Upload the documents. The checklist shows exactly which documents are required for your project, with the Guidelines reference and the template to use.
- Choosing a file uploads it straight away, with a progress bar — you can also drag a file onto its line. The page is not reloaded, so anything you typed in the form above is kept.
- Documents already uploaded in an earlier step (for example the MAIN, the ERC copy or the land documents) are attached automatically to the new application, marked From B-2026-…. Documents that must be new each time (progress and monitoring reports, request forms) are offered with Use this file or Use them all instead. You can always upload a newer version.
- Countries (for example the buyer country of a Letter of Authorization request) are chosen from the international list: type part of the name in Lao or English.
- Step B asks for a Cover letter to the Relevant Sector (submission of documents), in addition to the MAIN and the other documents.
- Letters issued in the registry are not uploaded again. Step C does not ask for a copy of the Carbon Credit Project Approval Certificate, and E1 does not ask for a copy of the Letter of Authorization: the registry already holds them.
- Step D — Letter of Authorization request. Choose the buyer country and list the Entities to be authorized: one row per entity, with its name and Entity ID (ERC / TIN, or the account ID in the registry of the buyer country). Your organisation is filled in as the first row. An Evaluation report from an external reviewer can be added as an optional supporting document.
- Step D2 can be submitted while D1 is still under review.
- Press Submit. You receive a confirmation with the application reference (for example C-2026-0003) and the date by which the completeness check must be finished.
Hard copies (Steps B, C and D)
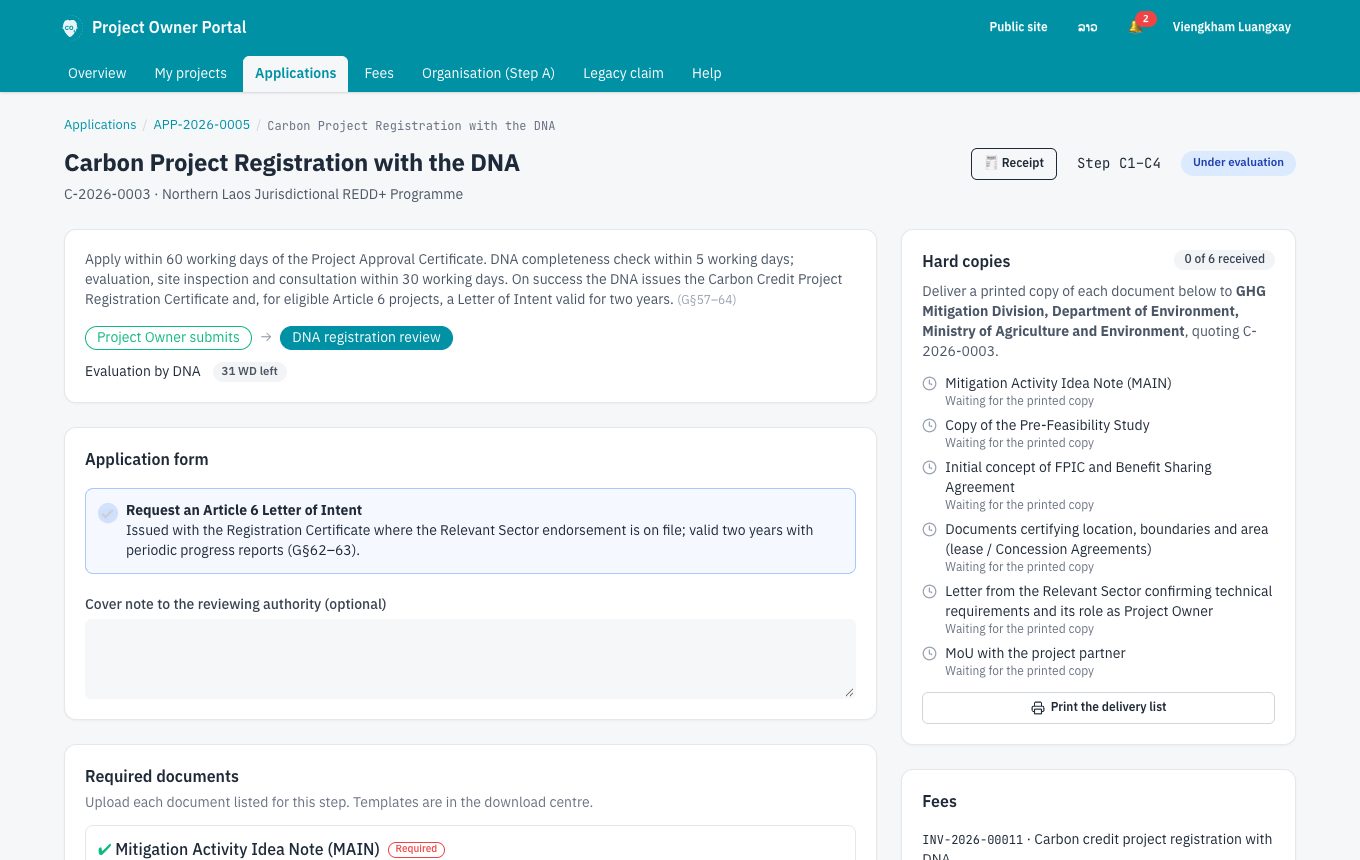
For the Project Approval Certificate (Step B), registration with the DNA (Step C) and MADD validation / Letter of Authorization (Step D), the documents are also needed on paper. Deliver them to the reviewing authority: the Relevant Sector at Steps B and D1, the DNA at Step C. After you submit online, the application shows a Hard copies card: it tells you which authority to bring the printed documents to and the reference to quote. Use Print the delivery list, bring it with the papers and have it signed and stamped at the counter.
Each document shows Waiting for the printed copy until the authority records that it has arrived; it is then marked Received with the date. Documents scanned at the DNA counter still need their printed copy. You are notified when everything has arrived. The application cannot be approved until every printed copy is recorded as received.
What the status means
| Status | Meaning | What you do |
|---|---|---|
| Draft | Not yet sent | Complete the form and documents, then Submit |
| Submitted — completeness check | The authority checks that everything is there (5 working days) | Wait; answer messages if asked |
| Returned — incomplete | Something is missing or wrong; the reasons are written on the application and in the e-mail | Correct the form or replace the rejected documents, then Resubmit |
| Under evaluation | Inspection, consultation and decision; the due date is shown | Prepare for a site inspection; pay any fee marked before decision |
| Approved | The decision is positive | Download the letter; the project moves to the next step |
| Not approved | A Notice of Decision explains the reasons and any remedial steps | Follow the remedial steps; you may apply again |
Applications and their history are listed under Applications. Use the Messages box on an application to write to the reviewing officer; every message is kept in the history.
Communication (MoC) — who may speak for the project
For Article 6 projects the DNA needs to know who may give instructions for the project. Open the project and choose Communication (MoC) (the modalities of communication of the Article 6.4 mechanism, form A6.4-FORM-AC-046). An approved MoC is needed before the Step D application.
Press Prepare the MoC statement. Your organisation is filled in as the activity participant and focal point.
For each activity participant and focal point, give the name, address, the Party (country) authorizing its participation, and its role for each scope of authority:
- (a) forwarding or transfer of the project’s credits,
- (b) changes to these modalities of communication,
- (c) all other project matters.
Sole = one entity only; Shared = any of the entities may act alone; Joint = all of them must sign together.
Give a primary (and if you wish an alternate) authorized signatory for each entity and upload their specimen signatures.
Upload the supporting documents showing that each signatory may sign (power of attorney, board minutes, registry extract) — dated within the last six months; copies of ID documents are not time-limited.
Print the statement, have one authorized signatory of every activity participant sign it, and upload the scan.
Press Submit to the DNA. The DNA checks the signatures against the specimens and approves the statement, which is then in force. To change it later, use Request a change to the MoC within 90 days of the change.
The public project page shows only the names of the focal points and their roles — never contact details or signatures.
Fees and payments
When an application has fees, an invoice appears under Fees and on the application. Pay by bank transfer or at the DNA office, then upload the payment slip on the invoice. The DNA verifies the payment.
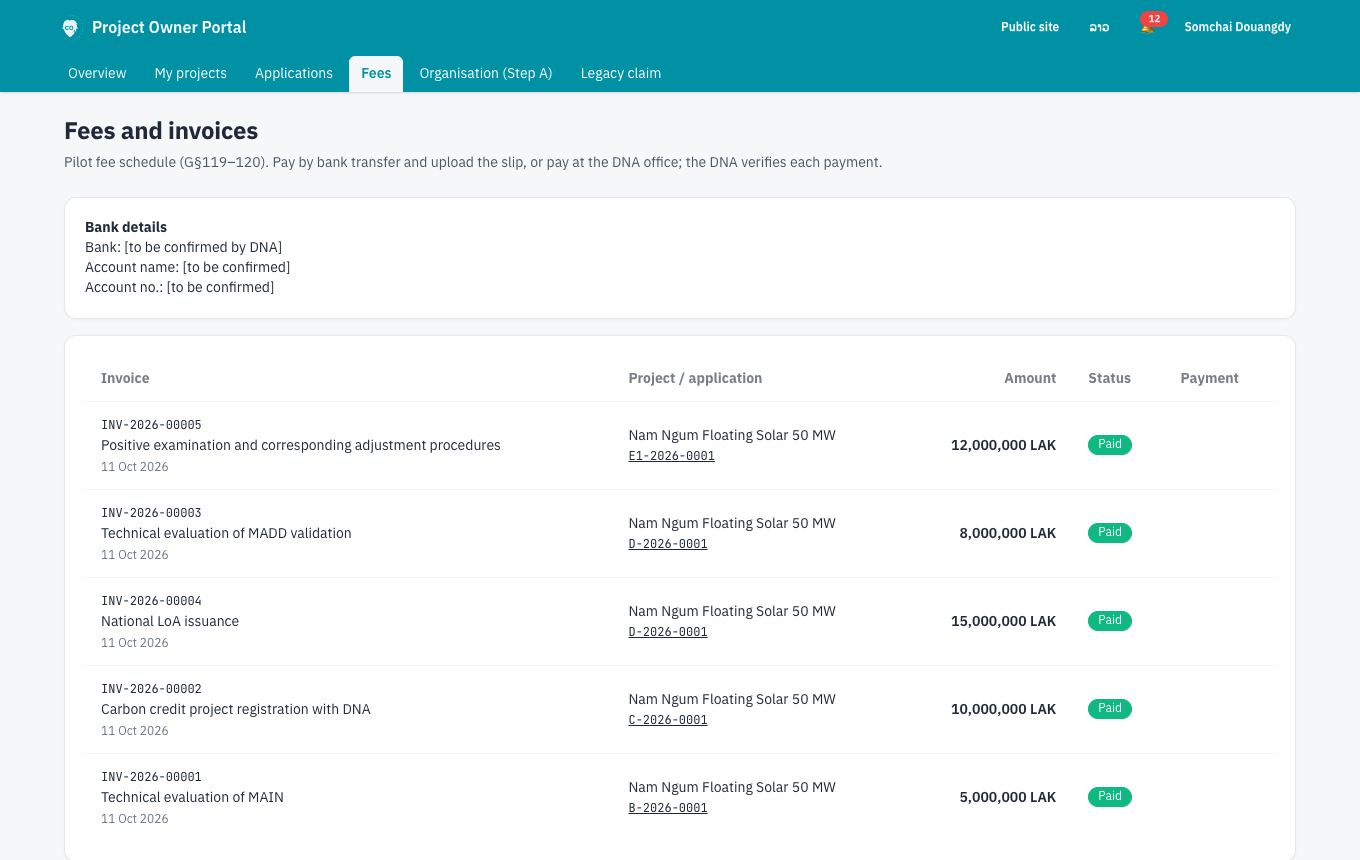
Fees marked before decision must be paid and verified before the final approval of the application can be recorded.
Letters and certificates
Every letter and certificate (Project Approval Certificate, Registration Certificate, Letter of Intent, Letter of Authorization, Letter of Positive Examination…) is issued in the registry with a reference number, a verification code and a QR code. Open it from the application or from Letters on the project to print or save it as PDF.
The issuing authority prints each letter, signs and stamps it, and uploads the scan. The letter page then shows a Signed and stamped copy button; until then it says Signed copy not uploaded yet.
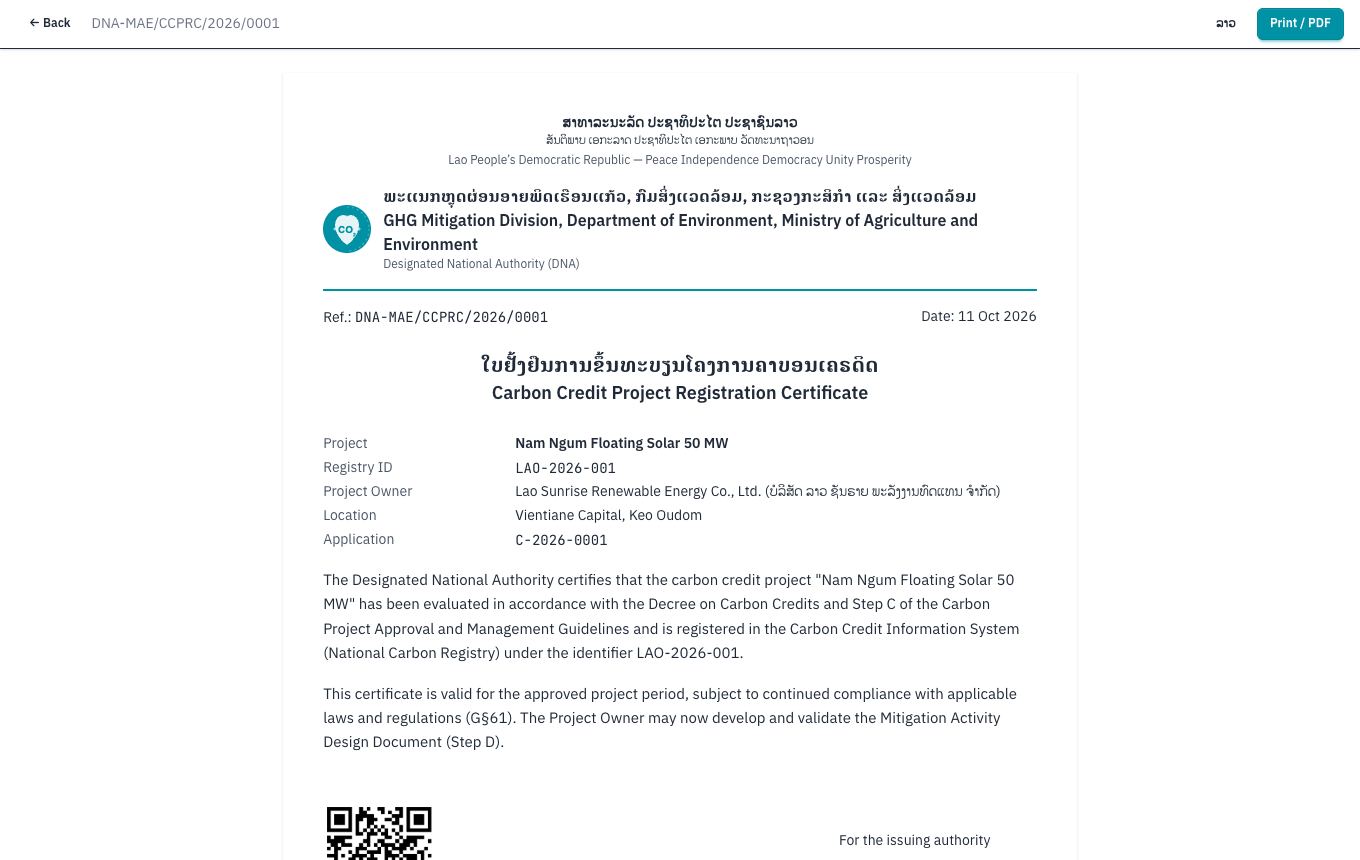
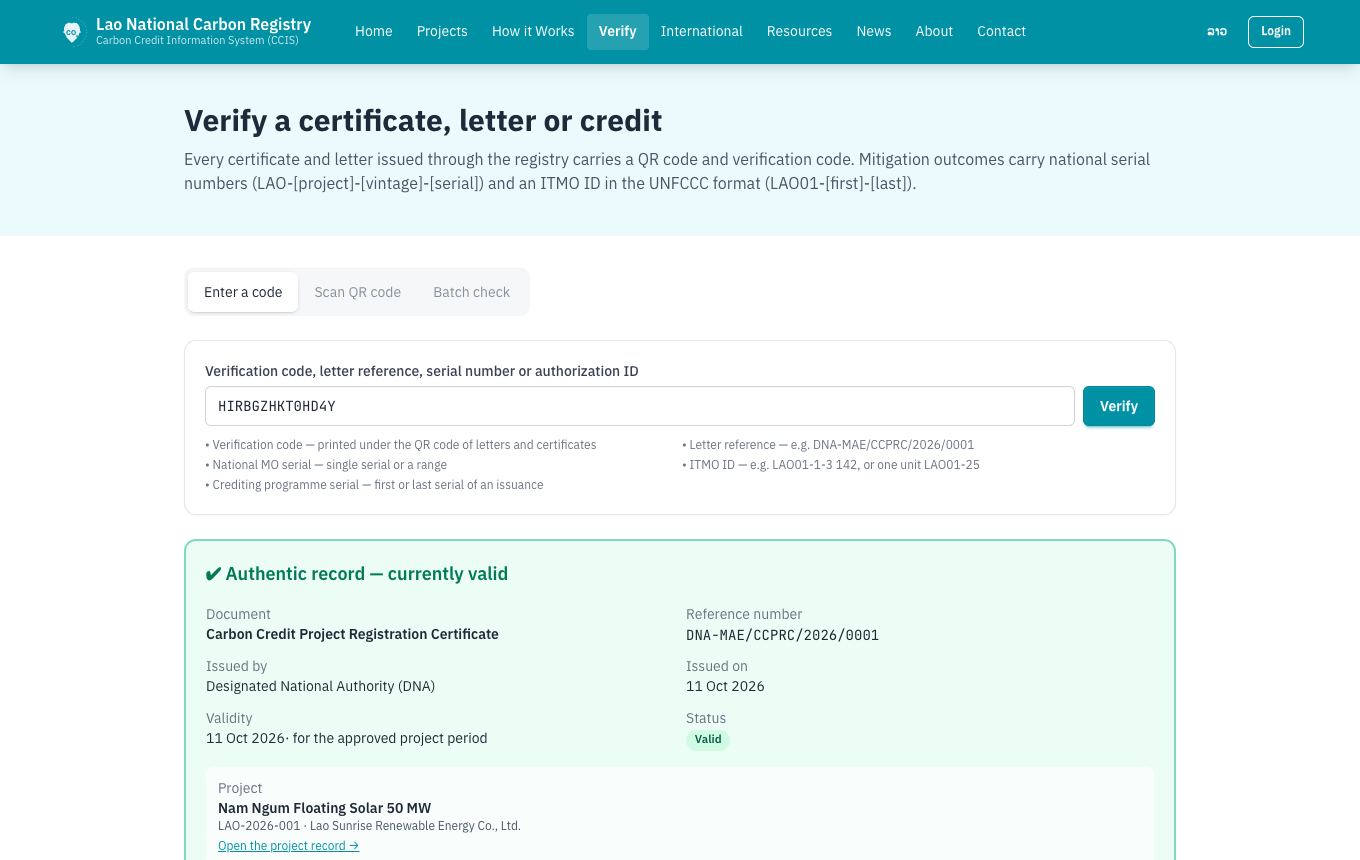
Anyone — a buyer, a bank, another registry — can confirm that a letter is genuine and still valid by scanning the QR code or entering the code on the public Verify page. The same page checks a credit serial number or ITMO ID.
Credits and Article 6
- Article 6 mechanism. When a project seeks Article 6 authorization, choose the mechanism: Article 6.2 bilateral cooperative approach, the Joint Crediting Mechanism (JCM) (itself an Article 6.2 cooperative approach) or PACM (Article 6.4).
- E0 — issuance record. After each verification, report the credits issued by your crediting programme. The registry calculates the share reserved for Lao PDR according to Table 2 of the Guidelines.
- The monitoring period and every vintage must fall within the project’s crediting period, and the buffer cannot exceed the verified quantity. Both are checked at submission and again at the decision.
- Under Issuances by vintage, add one row per vintage, or use Import from CSV. Download the CSV template for the columns:
vintage,verified_qty,buffer_qty,first_serial,last_serial,label. The rows are checked before you save. - For each row, choose the Label at the registry: None, Article 6 Authorized, Correspondingly Adjusted or CORSIA eligible. Serial numbers already recorded in the registry are refused.
- E1 — request for positive examination (Schedule 7). For authorized credits, request the positive examination by vintage.
- The form shows, from your Letter of Authorization and read-only, the cooperative approach, the authorized entities, the purpose(s), the authorization period and the approved quantity.
- The table Available for positive examination, by vintage shows what was issued after the buffer, the reserve for Lao PDR, what was already examined and what is available. A request above the available quantity of a vintage, or above the LoA ceiling, is refused when you submit.
- The proof of transfer of the reserve must cover the reserve due. After the Relevant Sector endorses it, the DNA issues the Letter of Positive Examination. Each block of mitigation outcomes receives a national serial range and a UNFCCC ITMO ID (for example
LAO01-1-37 080).
- Transfers, uses and cancellations happen in the programme registry and the UNFCCC International Registry. Report them on Credits & Article 6 so the DNA can record them and apply corresponding adjustments.
- Letter of Authorization renewals, modifications and non-continuation notices are separate applications on the project.
On Credits & Article 6, the tables of credit issuances and national MO serial numbers may show Available soon while the DNA finalises how they are presented. What you report at Steps E0 and E1 is recorded in the meantime.
Projects that existed before the registry
If your project was registered with Verra, Gold Standard, CDM or another crediting programme before the Carbon Credit Decree, it is a legacy project. The DNA notifies you in writing and you have 180 working days from the notification to register it (G§33, Decree Art. 65).
- Create your account and complete Step A (your organisation), as for any project.
- Open Legacy claim in the portal menu.
- You have the DNA letter: enter the claim code from the letter and press Find.
- You have no letter yet: under No claim code yet? Find your project, type the project name or its Verra / Gold Standard / CDM ID (for example
2367) and pick it from the list. If the DNA has not notified you yet, press Ask the DNA for a legacy notice. If a notice was already issued, use the claim code from that letter.
- Check the details (project, standard, registry ID, deadline), tick the confirmation that your organisation is the Project Owner and press Claim and start legacy registration. The project is created with its programme and registry ID, and linked to its international record.
- Upload the documents of the legacy registration application: MAIN, proof of registration with the programme, registered PDD/MADD, land documents, and if available the latest monitoring and verification reports and the Benefit Sharing Agreement. Submit.
- DNA review. The DNA reviews the application (a differentiated assessment applies) and issues the Registration Certificate with your national project code.
- Record your issuances (Step E0). A project already registered with its programme goes straight to Step E — no second validation (D1) or programme registration (D2). For each issuance, enter the vintage, the verified quantity and buffer, the first and last serial numbers from the programme registry, and the Label at the registry (None, Article 6 Authorized, Correspondingly Adjusted or CORSIA eligible), or use Import from CSV. Serial numbers already recorded in the registry are refused.
- Report every trade (Decree Art. 25). Under Reporting → Report a transfer, retirement or cancellation, register each sale, transfer or retirement within 10 working days: choose the recorded issuance for Verra / Gold Standard units (the balance after the share reserved for Lao PDR is checked), or the MO block for ITMOs. Late reports are flagged to the DNA.
- Article 6 (optional). Only if you want an Article 6 Letter of Authorization, apply for Step D1 from the project page.
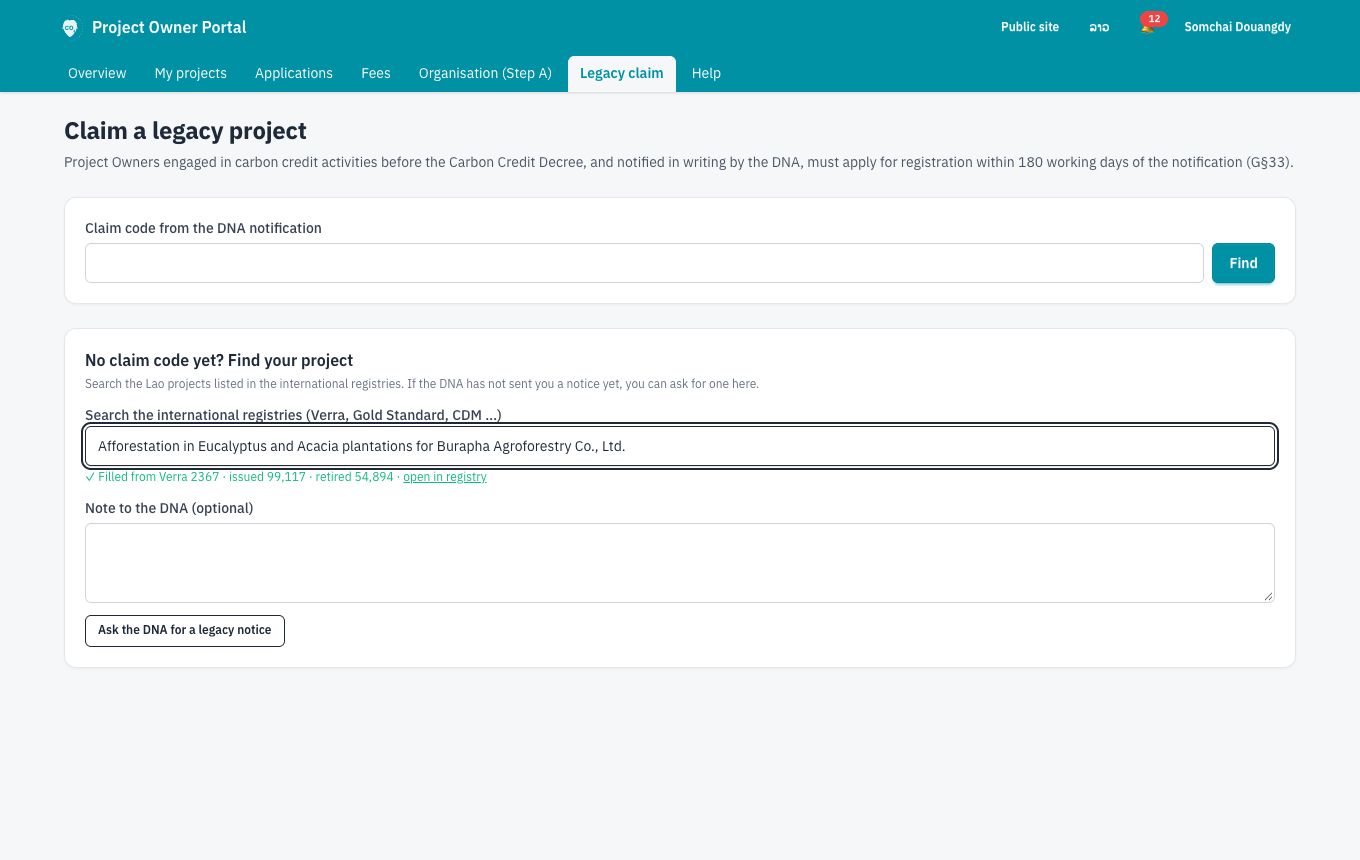
At Step D2 (for projects that are not legacy projects) you can also search your project in the international registries instead of typing the registration number: the number, programme and link are filled in.
Getting help
- Video guide: a short animated film (English and Lao) on how to register a carbon project is on the homepage, on How it works and on the Resources overview.
- Resources (menu of the website) has an overview and six sub-pages:
- Carbon market 101 — a short introduction to carbon credits, the voluntary carbon market and Article 6, with the explainer film and learning materials;
- Schedules 1–8 — all templates of the Guidelines (each step’s document checklist links straight to the right Schedule);
- Laws and strategies — the core laws for carbon markets first, then other relevant laws, strategies and policies by sector;
- Guidelines and reports — sector guidelines, national reports and user manuals;
- Glossary — the terms of the official Glossary on Carbon Market in English and Lao, searchable A–Z; click a term to open its definition (or Expand all);
- FAQ — answers to common questions in six topics (getting started, registration and approval, Article 6, carbon credits and safeguards, the registry, the carbon market); search them or pick a topic. The Resources menu at the top opens on hover and lists every Resources section.
- Public project database: filter projects by crediting period, cooperative approach and authorized use (NDC, OIMP, CORSIA).
- Contact: the Contact page sends your question to the DNA; you receive the answer by e-mail.
- Your account: change your name, phone or password under My account (menu with your name).